Showing posts with label Tools. Show all posts

2007-07-13

Command line: do you still use it?

Well, I do and for quite some years I've been using JPSoft's 4NT. I have some nice batch files, custom prompts, custom functions and it has a whole lot of built-in commands, variables and functions as well.

But, not only do I find myself doing less actual command line stuff, I sometimes get a bit mad at this product, like yesterday when I was attempting to use drive aliases inside a function and later found out that it doesn't work there, only in commands... Kind of the legacy from a program that, the author has admitted, has a ton of different parsers for a ton of different functions/commands. It's also partly due to the fact of maintaining compatibility with command.com and cmd.exe in their many versions and changes so far, but sometimes I think that it would be better to use something else for my command line scripting, perhaps something that doesn't carry this legacy compat baggage and thus can have a more uniform and predictable syntax.

Which brings me to the question: do you still do comand line? What tools/programs do you use for it? Or do you rely on good old fashioned cmd.exe for your command line work?

I've once tried to use PowerShell from MSFT, but, not only did it still have a lot of rough edges (like, for instance, not being able to easily work on files with some valid dos file name characters!), and, even though it is a very considerable change from cmd.exe, and sure looks powerful, it wasn't that much better than cmd.exe and even a bit lacking in many basic functions, at least a couple years ago when I tested it!

So, if you have a nice experience with something other than 4NT/CMD/COMMAND, let me know what you use and how happy you're about it and I may even go and try that for a change!

2007-05-08

Tweak away

I'm a tweaker! I know that there may be some cures around for it, but I simply don't want to be cured! :)

I hate bloated software and what it does to Windows' Registry, so, whenever I get a chance, I tweak some program to my liking. The last tweaked one was Acrobat Reader 7.0.9.

Now, what exactly do I tweak and what for?

Well, I hate having to install a gazillion programs just to be able to do my normal work, so I've created a D:\Utils folder where I keep many such utils in such a way as not to require installation.

At most, a .reg file to run to register some file extensions or a batch file to regsvr32 some dlls (actually, I have both as part of my setup process that I update whenever I add a new utility that requires some of that work).

Why?
  1. It's way faster than installing it all! Just restore that folder, run a reg and a batch file and they're all easily accessible!
  2. My computer never ran faster with so much less registry/installer trash in it! It even shutdowns faster than my father-in-law's brand new Vista laptop suspends and my computer is 2 years old!
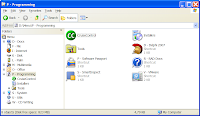
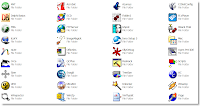
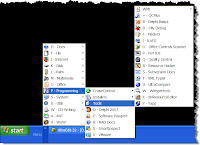
  3. I use an alternative menu, I simply add that menu in a few seconds and they're all ready to use. You can see 3 things in the images below: my current D:\Utils folder, my menu and the files that make up the menu.
Here's how it's all done:

I have 2 folders: D:\Utils which has some subfolders for those utils that have plenty of files and a Misc folder for those 1 or 2 file utils; D:\Menu, where I keep the menu shortcuts to access those programs and some other programs that I have to install such as Outlook, Word or Delphi!

The D:\Menu folder is actually just a bunch of shortcuts, named in such a way as to have all the options starting with a different character. It also has subfolders that I customize and change the icon so as to be more clear what they have inside. Then, by simply having those two folders on my D: drive, all I need to do is right-click on the taskbar, select Toolbars->New Toolbar... and browse for the D:\Menu folder. Reposition/resize so as to be so small that not a single icon shows and in a way that it's to the right of the Start Menu and presto: an easy to access menu, either by mouse or, as I most use it, by keyboard...

Keyboard access is easy: Windows Key, Tab (that's not Win+TAB, but two separate key presses: Windows Key opens up the Start menu, TAB tabs away to the next item which is my menu. For instance, Win, Tab, P (for programming), D (for Delphi).

[EDIT]: Apparently, for Win, Tab to work it requires the XP start menu: it doesn't work with Classic Start Menu. It doesn't require themes though, so either themes or no themes as long as you use the XP menu (2 column) pressing Win then Tab will open the menu...

And there you go: after a format, and a couple clicks, I have all those utils shown below and many more on the Misc folder, ready to be used.

Now onto today's tweak which is what led me to start this post! :)

After trying to tweak Acrobat 8 into working in my D:\Utils, I decided to give up and go for an older one. 8 relies too much on MSI features and insists on re-installing files that I don't want there! Plus, there's nothing really useful in it. Also, I must add that I don't read PDFs inside any of the browsers: with all security flaws constantly showing up, it's safer to download it and read it off-line. So, how does one set up Acrobat 7 in a way that it doesn't require installation?

Easy!

Start by downloading it (Acrobat 7.0.9)

Then, using a VM (or a trash computer or even your own if you don't mind the registry trash that installing/uninstalling will leave behind!), install it.

Then, go to %programfiles%\Adobe and copy the Acrobat 7.0 folder. You can also copy the %windir%\Installer\{AC76BA86-7AD7-1033-7B44-A70900000002} folder if you want some of the extra icons but it's not really required. If you installed on your own machine, uninstall and reboot.

Now put the saved folder in it's final destination (in my case, I placed it in D:\Utils and renamed it to just Acrobat) and let's trim away some needless stuff:
  1. Delete the following subfolders:
    1. ActiveX
    2. Esl
    3. Resource
    4. Setup Files
  2. Move all the files/folders inside Reader\Plug_ins into Reader\Optional (you may want to keep just Search.api and Search5.api). If you later find that some functionality such as signing or form filling is needed, you can go back to the optional folder and move those back to the plug_ins. Not having them there makes Acrobat fly when starting even without resorting to pre-loading the DLL files on startup as done by reader_sl.exe on a default install.
  3. You can also safely delete Reader\reader_sl.exe and Reader\AdobeUpdateManager.exe
Now, just double click a PDF file and browse to the Reader\AcroRd32.exe file and select to use that as the default. You'll accept the license and you can then go to the File Types (Tools->Folder Options in Explorer) and select Advanced and change the icon to another one of your liking.

If you save the following registry keys, you can later, on a subsequent installation just run that reg file and have it ready to go:
HKEY_CLASSES_ROOT\.pdf
HKEY_CLASSES_ROOT\pdf_auto_file

Saving HKEY_CURRENT_USER\Software\Adobe\Acrobat Reader\7.0 will allow you to have your options ready as you like, but save only after you set them! :)

Just export those, add to your master_reg file and next time you waste no time setting those up.

BTW: in case you're wandering how the 3rd screen-shot only shows my D:\Menu folder and nothing else: "explorer /root,D:\Menu\"


EDIT: One final tweak... Removing the ADS from Acrobat Reader 7...

Use regedit or add this to your master_reg file:

[HKEY_CURRENT_USER\Software\Adobe\Acrobat Reader\7.0\AdsInReader]
"bShowAds"=dword:00000000

2007-04-26

My must have utils - Part 3 (VMWare)


Any self-respected programmer already uses this, unless they are masochists! :)

Still, for those few who don't yet know what this is all about, or for those mislead sheep that are using something else, here's a quick rundown of the features that I like in VMWare Workstation:
  1. Speed. If you try other products, you'll see the difference! Given enough memory, your VMs can run nearly as fast as your main machine.

  2. Snapshots and "Revert to snapshot on shutdown": these two are invaluable if you need to keep a VM clean of outside interference. I have this on several VMs, but particularly on one where I also installed Delphi 2007 and didn't touch a single setting. This way I can validate if some particular odd behavior I may get in my dev machine is due to some of my tweaking or due to some third party component I am using. It's also invaluable to validate QC reports.

  3. You can quickly create a new independent VM from any snapshot, e.g., I keep a base Windows VM with a clean snapshot and when I need another VM to test something, I create a new one from that snapshot. It's faster than using many snapshots on a single VM and also more flexible: I can, for instance, put seldom used VMs on an external USB2 HDD (and they work fine from there!).

  4. For VMs set to revert to snapshot on shutdown, shutting them down only takes a few seconds: no waiting for logoff and guest OS shutdown!

  5. There is a free player from VMWare, should you want/need to distribute a particular VM for someone else to test (just don't forget of copyright issues on what OS/Apps you have there!)
    In fact, there are also some freeware VMWare creation tools that allow you to work with VMs using only the player engine...

  6. You have a lot of power in what hardware is present in your VM (Disks, CD-ROM, Network, Sound, USB) and you can set it to automatically use new USB devices plugged to your computer to a running VM.

  7. There's even a Physical Machine Converter tool, so you can grab a physical machine and have it run inside a VM: i tried this a few weeks ago, and it worked like a charm!

  8. You can archive your machines easily on DVD or any other medium of your choice: don't forget to use the "Split in 2 GB" option when creating the virtual disks: it's easier to split that up between DVDs!

  9. EDIT: Someone just reminded me of another feature that is worth mentioning: Cut/Paste and Drag'n'Drop between the host and the guests or between multiple guests... Very handy thing...

  10. EDIT: How could I also miss this one! You can set access to virtual folders, i.e., folders in the host OS that you can map as disk drives on the guest, so you can save your work there and still have an always clean machine.

  11. Overall, it works very well, fast, reliable and flexible, so get the trial, set it up and see what you've been missing!

2007-04-24

My must have utils - Part 2

This time, I'll write a bit about another of those tools I can't live without: TreeSizePro.
I like to be in control of what's going on on my computer, rather than have it decide what's best for me. That's how I knew that Delphi 2007 PRO's default full install requires 3.6 GB free HDD space, even though there's only around 700 MB worth of CodeGear stuff. Using TreeSizePro it's child's play to find that out: I start by scanning the target hard-drive and Save the report as XML; then, I install the tool(s) I want and finally I run another scan of the hard-drive. When it's done (usually a few seconds), i use the built-in option to compare that snapshot with the previously saved one. And voilá! Couldn't be easier: not only you'll find out how much space that install is using, but, more importantly, where was that space spent... Like, in the above example, 2 GB of cached install files...

Other nice features:
  1. Integrates with explorer, so I can right-click on a folder/drive and run it there;
  2. You can automatically expand/hide all folders above/below a certain threshold;
  3. You can see where your space is going (top 100 files), what types of files use what space, how are your files taking space distributed by file age;
  4. You can see the number of files or space used or percentage of space used;
  5. You can see file usage by users, should you have several users on your computer (also runs on servers);
  6. Schedule scans to occur at some time/date or with a certain frequency;
  7. Export to Excel, HTML, Text, XML;
  8. Search for Biggest/Oldest/Temporary files;
  9. There's even a limited (in functionality) Freeware version if you don't want to spend any money...
And a lot more options. Go there, try it and see for yourself. If you don't want/can't spend money on such a tool, get the free version even though the Personal version is cheap enough not to be without it!... If your drive has limited space or if you just like to know where that space is going, just give it a spin...

[Edit]: Forgot to mention that this one is another one of those utils that I run without installing first: D:\Utils\TreeSize...

Here are a few appetizer images:


My must have utils - Part 1

Well, those who have paid more attention already noted a box with links to some of my must have utilities. However, every now and then I keep referring someone to one of these utils, so I decided to blog a bit about them. Every day or every other day I'll pick one of my must have utils and blog a bit about it. Most are programming related, but then, so much for the better as this blog is about my experiences with Delphi...

Just a small note before starting: I'm doing this about tools I already own, and am not getting paid to do so: I just want to spread the word, as sometimes, for not knowing, we tend to get stuck to old ways of doing things when there are so many nice tools around. Also, I've spent many hundreds of dollars/euros in less than good tools, so if I can help someone else go for the right tools instead, I'll be happy for being of service! :)

Today I'll talk a bit about one that most of you probably already use: SnagIt, from TechSmith.

You can see many examples of SnagIt in my previous blog posts: whenever I need a prtscr, rest assured that it's not the old prtscr that is being used!

You can get the trial from the link above, so I'll just give you some pointers on the features I love in SnagIt:
  1. You can have several shortcut keys for different capture profiles: I use PRT-SCR for a selection capture, SHIFT-PRTSCR for a Window Text Capture and ALT-PRTSCR for a Window Graphics Capture.
  2. Scrolling Window Captures: have you tried to capture the whole list of, say, Delphi 2007 Install Options? Or the Control Panel? "Normal" procedure would be several runs of PRTSCR and some lengthy copy/paste... Not with SnagIt as you have a profile for that! Just select "Scrolling Window", hit PRTSCR, select the window and watch it do it's magic!
  3. Easily blur/dim non-relevant areas: only a few clicks away and you get to draw attention to what you really want to focus on and/or hide sensitive information while still showing the big picture;
  4. Easily add visual clues that the image is only part of what you want to show, again, only a few clicks away;
  5. Easily add captions, arrows, callouts, highlights, stamps, you name it! And by default, they all come with a nice shadow effect that you can disable if you don't like...
  6. You can save the images in a proprietary format but keeping all those arrows, etc, so that you can later move them around, change colors, add/remove new callouts, all without needing to go grab that screen again;
  7. You can capture a full-screen DOS or DirectX application;
  8. You can capture non-rectangular areas or even multiple areas at once;
  9. [EDIT]: Almost forgot this one! You can create your own presets which may include some effects like thorn edges, scaling, color changing and more and assign hotkeys to them too...
And there are plenty other options available! :)

Also, this is one of the utils that I have managed to not-install, i.e., I installed once into my D:\Utils\SnagIt folder and when I re-install my windows in C:, all I need is run it once, register it, set it to auto-run on startup and set my preferences, that is, if I didn't save the %appdata%... :)

Here are a few examples of what can be achieved with SnagIt, but the best thing to do is to try for yourself: soon you'll get used to hit prt-scr, do whatever you need to do to the image *on the spot* and save it: no more prtscr, open graphics editor, paste, manually process image... You'll get quality screenshots in no time, be it to show your customers something or to add to your documentation or a bug report to someone...

Note: these images were done completely within SnagIt's Editor, that is, PRT-SCR, edit, save: no manual retouching in any other editor was done. Also, if I saved in it's native format, I'd be able to later edit/move/replace any of those edits...) (Click them for larger versions)