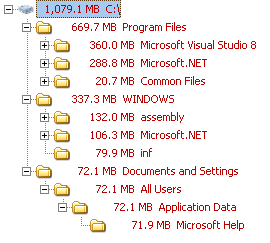
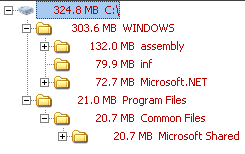
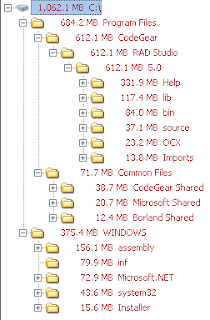
In this post, I'll explain to all those hackers around how to install the Delphi 2007 ESD while preserving 2.6 GB of your C: drive. You will require 1.2 GB on another partition, but if you're like me, you'll have those around! :) Still, your total will be 2.2 GB versus the default 3.6 GB and you'll loose nothing important (other than redundantly cached install files and needless .NET help...)
I like to keep my C: drive as lean as possible so as to be viable to make a compressed GHOST image of it and still fit a fully installed and configured working environment on a DVD. This way, I can restore my system to a working condition in around 10 minutes. However, the default way of installing Delphi 2007 simply uses 3.6 GB of C: space! So, I needed to come up with something different. CodeGear is supposedly working on a better install, although it's now a whole month since Delphi 2007 is out and that new installer is yet to be seen, and, even worse, due to SOX, they won't commit on a date for when that's coming out...
So, let me describe this process, which I must say I haven't tested on Vista as I don't use that... It does however work very well in decent versions of Windows such as XP, 2000 or 2003.
There are two main goals that I want to achieve here:
1) Setting up Delphi 2007 while simultaneously keeping it from caching stuff on C:;
2) Improve the help by not returning .NET results and, again, shave some few more MBs from C:.
This 2nd part should only be followed by those not requiring the .NET help for another dev tool, that is, for all those that like myself couldn't care less of .NET and only develop "for Win32".
Step 1: Download the following 3 prerequesites:
1) Microsoft .NET Framework Version 2.0 Redistributable Package (x86)
2) Microsoft Visual J# Version 2.0 Redistributable Package
3) .NET Framework 2.0 Software Development Kit (SDK) (x86)
You should now have the following 3 EXE files:
setup.exe
dotnetfx.exe
vjredist.exe
Step 2: "pre-process" those files.
Using WinZip, 7-Zip or your favorite archiving tool, uncompress all those 3 files (yes, they're self-extracting .ZIP files but we want some control!). Extract the contents of each file onto it's own folder.
You should now have the following 3 folders:
setup
dotnetfx
vjredist
Rename "setup" to a more descriptive "dotnetsdk".
You should save them somewhere where you can access them later, should you want to modify the installations. In this example, we'll be using D:\Install, so move them all over there.
Step 3: Installing the prerequesites.
1) Run "D:\Install\dotnetfx\install.exe"
2) Run "D:\Install\vjredist\install.exe"
3) Run "D:\Install\dotnetsdk\install.exe"
In this last one, select only "Product Documentation": the other two options are not needed.
Q: Why did we uncompress these and "manually" run the MSIs?
A: We're doing this to save you 400 MB of C: space in exchange of a couple minutes of your time!
Q: And how are we saving space?
A: That's what we'll do next!
Step 4: Saving 400 MB of cached files in C:, while still not breaking anything...
Installing those 3 products cached the install files on C:. We will now update the registry to point to the same files in D:\Install, so as to allow you to Remove/Repair apply any security update on any of those products...
Using RegEdit, change the following values:
Start by navigating to here:
HKEY_LOCAL_MACHINE\SOFTWARE\Microsoft\Windows\CurrentVersion\Installer\UserData\S-1-5-18\Components\
Key.....: 5B868AEEE5852414A85EBF681240D704You can also delete (but it's not required) the following key:
Value...: D6461317C3DC4F04799BDCE9E42626FE
Old Data: C:\WINDOWS\Microsoft.NET\...\netfx.msi
Set To..: D:\Install\dotnetfx\netfx.msi
Key.....: 521E4F6057E22F94ABD31D61977E7BAD
Value...: 2C951936B72B802498568D0AEABDED2D
Old Data: C:\Program Files\...\netfxsdk.msi
Set To..: D:\Install\dotnetsdk\netfxsdk.msi
Key.....: EF03A325B58ACCF46AD453FC5B8D3A6D
Value...: 2C951936B72B802498568D0AEABDED2D
Old Data: C:\Program Files\...\netfxsd1.cab
Set To..: D:\Install\dotnetsdk\netfxsd1.cab
Key.....: AAC54F5B3FA6B6B45864A1DA921F3C4C
Value...: 34053A86A55C7324889C73EEC136DE17
Old Data: C:\WINDOWS\Microsoft.NET\...\jsredist.msi
Set To..: D:\Install\vjredist\jsredist.msi
Key.....: 0DFA9869D465FA14CAFF90CB479360E9
Value...: 34053A86A55C7324889C73EEC136DE17
Old Data: C:\WINDOWS\Microsoft.NET\...\jsredis1.cab
Set To..: D:\Install\vjredist\jsredis1.cab
HKEY_CLASSES_ROOT\Installer\Products\D6461317C3DC4F04799BDCE9E42626FE\SourceList\Net\2
Since the 1st one is set to the correct path, this "2" will be ignored anyway.
By now, you've just lost 1.079 MB. Yep! That's 1 GB of .NET prereqs for a "for Win32" product! :)

Don't worry, we'll shave some of that now!
Step 4b: "Safe" shaving...
You can now delete the following folders as they're no longer required:
"C:\WINDOWS\Microsoft.NET\Framework\v2.0.50727\Microsoft .NET Framework 2.0"
"C:\WINDOWS\Microsoft.NET\Framework\v2.0.50727\Microsoft Visual J# 2.0 Redistributable Package"
"C:\Program Files\Microsoft Visual Studio 8\Microsoft .NET Framework 2.0 SDK - ENU"
We have now cut down our losses to "only" 685.4 MB...
Step 4c: ".NET Help" shaving: only do this if you don't require .NET help in any development application:
(If in doubt, make a backup of those files elsewhere so as to undo it later...)
Delete the following folder:
"C:\Program Files\Microsoft.NET\SDK\v2.0\Docs\1033"
Delete all files starting with "MS.NETFramework.v20." in this folder:
"C:\Documents and Settings\All Users\Application Data\Microsoft Help"
We have now cut our losses to only 324.8 MB and simultaneously prevented Delphi 2007 from showing unappropriated .NET help...

If you have the time, there's a couple hundred registry references to all those files/folders we deleted above: I haven't bothered with deleting/changing them all and all seems to be working just fine. Maybe if one of these days I find myself some free time I'll make a program to automate all that...
Step 5: "A small trick..."
Now for the fun part! :)
- Create another user on your computer named "Install" and make it an admin.
- Log off your current user account and login to "Install".
- Now log off again and back to your "regular" user.
- Open RegEdit and navigate to this key:
"HKEY_LOCAL_MACHINE\SOFTWARE\Microsoft\Windows NT\CurrentVersion\ProfileList" - You'll find a few subkeys like "S-1-5-18", "S-1-5-19", "S-1-5-20", and a few more with much longer names, starting with "S-1-5-21-".
- You will find one that has the following value: "%SystemDrive%\Documents and Settings\Install" for the "ProfileImagePath". Change that into "D:\Install\Delphi2007". Don't forget to create the folder too!
- Now go into Computer properties->Advanced->User Profiles, select the "Install" profile and use "Copy To".
- In the new dialog, browse to the folder "D:\Install\Delphi2007" and in the "Permitted to use" type "Install".
- Now delete "C:\Documents and Settings\Install".
- Log back on to "Install" and run the Delphi ESD Setup.
- Important step:
when asked where to create the "shortcuts", answer "Just Me". If you choose "All users", you'll break this whole "leaning" process! - Just let the installer run and you'll notice that the cache is now being created in:
"D:\Install\Delphi2007\Local Settings\Application Data\{AB3EC276-D261-4943-A921-1CC1C6799AED}"
Note: If you already have downloaded the install files, you can simply cancel the install, copy the previously cached install files into the folder above and resume the installer. Or create the folder before running the installer and copy the files there then run the installer... :)
Note: When the installer finishes, or at some later time in the future, you can back up that folder to a DVD to be able to install later on another computer or at another time on that computer, should you reformat all... - Finish the installer and let it run "Delphi 2007" for the first time. For the moment, disable the option to check for updates automatically. (You can check manually by using the shortcut provided).
Now we need to do a few more things:
- Ensure the "Check for updates" will work;
- Migrate the settings to your normal account.
Ensuring the "Check for updates" will work:
We will leave that Install user exist on your computer: it makes future upgrades easier... Whenever there is a new upgrade, just log back to this user and run the update from there.
Migrating user settings:
Copy "D:\Install\Delphi2007\My Documents\RAD Studio" to your "My Documents".
Run RegEdit and export the following keys:
HKEY_CURRENT_USER\Software\Borland (save as D:\Install\Borland.reg)
HKEY_CURRENT_USER\Software\Classes (save as D:\Install\Classes.reg)
Edit D:\Install\Borland.reg and update the DBExpress paths in this section:
[HKEY_CURRENT_USER\Software\Borland\BDS\5.0\DBExpress]
Alternatively, you can simply use it from that location and don't edit the paths.
Finally, copy "D:\Install\Delphi2007\Start Menu\Programs\CodeGear RAD Studio" to your normal account's start menu folder...
Now log onto your account and run those two reg files.
Step 7: Enjoy using your Delphi 2007 having spent only 1.06 GB of C: instead of 3.6 GB...

EDIT: Note for self. Short url for this page: http://preview.tinyurl.com/2qdrmz
4 comments:
Great job, Fernando. I will be reinstalling my Win XP in near future and your 'guide' will be very helpful.
Marcin
Wow! Thank you very much! This is really a very cool hack. Your goals are absolutely right. I try to follow those too. Thanks!
heh ... "fat cow" :)
Excellent work, off to exercise the delete button.
Fernando,
thank you so much for this excellent advise, most of your way of working (ghost, tc, ...) are also for me THE way of enjoying borland^h^hcodegear product
PeterT
Post a Comment